
【算法笔记】散列表(哈希表 Hash table)的简单实践
Page content
今天用go语言简单的写了一下散列表(哈希表 Hash table)的方法。
为了以后方便查看,当做笔记整理了一下~~
1.散列表(Hash table)
我们先看看维基百科里是怎么解释的。
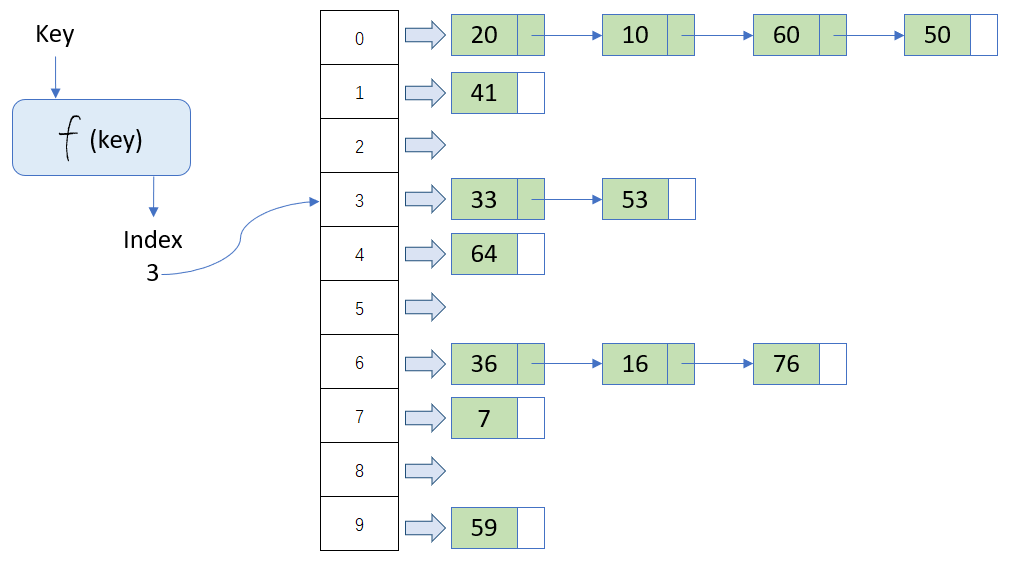
根据键(Key)而直接访问在内存储存位置的数据结构。也就是说,它通过计算出一个键值的函数,将所需查询的数据映射到表中一个位置来让人访问,这加快了查找速度。
这个映射函数称做散列函数,存放记录的数组称做散列表。
看看下图:
存储: 哈希表使用哈希函数(Hash Function) 将键(key)转换成一个哈希值。
然后在数组中获取对应的值,如果有值就会用链表的形式存储。
查询: 存储的过程理解了,查询看着下面流程也应该能理解。
key->f(key)->index->list[index]->linked_list。
删除: 省略… 需要注意的是删除链表的第一条数据和,链表中的数据需要额外的逻辑判断。
2.简单代码实现
struct
type HashMap struct {
 BucketMap []HashNode
 Size      int
}

type HashNode struct {
 Key   string
 Value int
 Next  *HashNode
}

//简单的模仿了哈希函数(Hash Function)
func GetHashCodeIndex(key string) int {
 return len(key) % 10
}
Get
func (h *HashMap) Get(key string) int {
 bucketIndex := GetHashCodeIndex(key)
 hashNode := &h.BucketMap[bucketIndex]
 if len(hashNode.Key) == 0 && hashNode.Value == 0 && hashNode.Next == nil {
  return -1
 } else {
  for strings.Compare(hashNode.Key, key) != 0 {
   hashNode = hashNode.Next
  }
  if hashNode == nil {
   return -1
  } else {
   return hashNode.Value
  }
 }
}
Add
func (h *HashMap) Add(key string, value int) {
 bucketIndex := GetHashCodeIndex(key)
 hashNode := &h.BucketMap[bucketIndex]

 if len(hashNode.Key) == 0 && hashNode.Value == 0 && hashNode.Next == nil {
  h.BucketMap[bucketIndex] = HashNode{Key: key, Value: value}
  h.Size++
 } else {
  for hashNode.Next != nil {
   hashNode = hashNode.Next
  }
  hashNode.Next = &HashNode{Key: key, Value: value}
  h.Size++
 }
    //这里可以添加数据量太多,查询速度慢的时候增加数组空间逻辑的方法
}
Remove
func (h *HashMap) Remove(key string) {
 bucketIndex := GetHashCodeIndex(key)
 hashNode := &h.BucketMap[bucketIndex]

 if len(hashNode.Key) == 0 && hashNode.Value == 0 && hashNode.Next == nil {
  return
 } else {
  parentNode := hashNode
  for strings.Compare(hashNode.Key, key) != 0 {
   parentNode = hashNode
   hashNode = hashNode.Next
  }
  if hashNode == nil {
   return
  } else if parentNode == hashNode {
   h.BucketMap[bucketIndex] = *hashNode.Next
   h.Size--
  } else {
   parentNode.Next = hashNode.Next
   h.Size--
  }
 }
    //这里可以添加数据量删减到一定程度后,减少数据空间的逻辑,一般不加。
}
IsEmpty,Print
func (h *HashMap) IsEmpty() bool {
 return h.Size == 0
}

func (h *HashNode) Print() {
 if h == nil || h.Value == 0 {
  return
 } else {
  fmt.Print(h.Value, " ")
  h.Next.Print()
 }
}
执行结果
func main() {
 bucketMap := make([]HashNode, 10)
 hashMap := HashMap{BucketMap: bucketMap}
 hashMap.Add("a", 1)
 hashMap.Add("ab", 2)
 hashMap.Add("abc", 3)
 hashMap.Add("abcd", 4)
 hashMap.Add("abcde", 5)
 hashMap.Add("1234567890ab", 12)
 hashMap.Add("1234567890abc", 13)
 hashMap.Add("12345678901234567890abc", 113)
 hashMap.Add("1234567890xabcde", 15)

 fmt.Println("-------------Size--------------")
 fmt.Println("Size:", hashMap.Size)

 fmt.Println("-------------Get--------------")
 fmt.Println(hashMap.Get("1234567890abc"))

 fmt.Println("-------------Add--------------")
 fmt.Print("Bucket[3]: ")
 hashMap.BucketMap[3].Print()
 fmt.Println("")

 hashMap.Add("123456789012345678901234567890abc", 1113)
 fmt.Print("Bucket[3]: ")
 hashMap.BucketMap[3].Print()
 fmt.Println("")
 fmt.Println("Size:", hashMap.Size)

 fmt.Println("-------------Remove--------------")
 hashMap.Remove("abc")
 fmt.Print("Bucket[3]: ")
 hashMap.BucketMap[3].Print()
 fmt.Println("")
 fmt.Println("Size:", hashMap.Size)
}
执行结果为:
$ go run main.go
-------------Size--------------
Size: 9
-------------Get--------------
13
-------------Add--------------
Bucket[3]: 3 13 113
Bucket[3]: 3 13 113 1113
Size: 10
-------------Remove--------------
Bucket[3]: 13 113 1113
Size: 9
后续思考
这样结构的HashTable遇到多线程的编程方式,会遇到什么问题?
欢迎大家的意见和交流
email: li_mingxie@163.com